
Chris Coyier has made a wonderful screencast about AJAXing WordPress theme. To AJAXify WordPress theme, he uses jQuery to make any internal link on the site will load into the main content area without requiring a page refresh, including search when the link is clicked. Althought the script works fine, it has 2 disadvantages: the internal links' href property are changed (hashized) and the back/forward buttons are not supported. So I decided to improve the script to make the AJAX functionality better.
I use a blank Thematic child theme as my test theme. Just download Thematic theme and put it in theme folder (you don't need to activate it). It contains a folder named thematicsamplechildtheme which is a sample blank child theme for Thematic. Copy it into themes folder and rename it to thematic-child, this is the theme that we will work on.
Step 1. Create needed javascript files
To support back/forward buttons while using AJAX, I'll use the jQuery hashchange event plugin by Ben Alman, you can grab it here. After downloading, create a folder js inside theme folder (which is thematic-child/js in my test) and move the javascript file into it.
We will use a custom javascript code, so make a blank javascript file called ajax.js in the folder thematic-child/js. Our AJAX code will be put in this file.
Step 2. Register scripts in WordPress theme
To ajaxify WordPress theme, first we need to include javascript files above into our theme by using function wp_enqueue_script(). Put the following code into the functions.php file:
if ( ! is_admin() )
{
    $url = get_stylesheet_directory_uri() . '/js/';
    wp_enqueue_script( 'hash-change', "{$url}jquery.ba-hashchange.min.js", array('jquery'), '', true);
    wp_enqueue_script( 'ajax-theme', "{$url}ajax.js", array( 'hash-change' ), '', true);
}
The first line will register the hash-change script, which needs jQuery library. The second line will register our AJAX script (which I call ajax-theme), it needs jQuery and hash-change scripts. Both scripts are located in the footer for better performance.
For more information about wp_enqueue_script(), please read the Codex.
Step 3. Implement AJAX code
3.1. Get site url and place holder
Now open the ajax.js file inside thematic-child/js folder. We start our code with:
jQuery(document).ready(function($) {
    var $mainContent = $("#container"),
        siteUrl = "http://" + top.location.host.toString(),
        url = '';

// more code here

});
Note that jQuery need to be used in noConflict mode, so I pass the $ symbol as a function's argument to make sure it can be used inside function (for ease, of course).
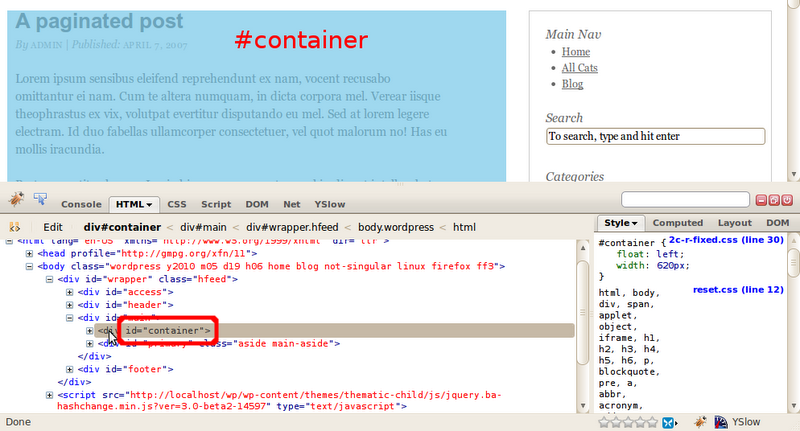
We get the place holder of our main content, which is #container in Thematic. It might be different if you use another theme. To know this section, you can use Firebug to find as in the following screenshot:
To get internal links, we need to know our site url, which is stored in siteUrl variable.
3.2. Add event listener to internal links' click
After that, we will add an event to internal links' click, which will change the url's hash:
$(document).delegate("a[href^='"+siteUrl+"']:not([href*=/wp-admin/]):not([href*=/wp-login.php]):not([href$=/feed/])", "click", function() {
    location.hash = this.pathname;
    return false;
});
The selector looks so complicated, doesn't it? Don't worry, it has the following parts:
a[href^='"+siteUrl+"']: which means all links that begin with our site's url (internal links):not([href*=/wp-admin/]): the links don't contain /wp-admin/ string (the links in admin dashboard). This might be the Edit post link or link to user's profile in comment form:not([href*=/wp-login.php]): the login/logout link, of course we don't want to load content via ajax from these pages:not([href$=/feed/]): and the last is feed links. This maybe the content feed link, comment feed link of whole blog or particular post. We don't want to load content via ajax from these pages, too
So, when we click on an internal link, which is not admin link, login link or feed link, we'll change the url's hash to link's pathname. For example, if our link is http://localhost/wp/a-paginated-post/, then when it's clicked, the location will be http://localhost/wp/#/wp/a-paginated-post/.
The return function prevent browser to go to original link.
In this script, I use the delegate() function to add event listener to click event. This method is implemented in jQuery 1.4 and is recommended instead of using live() function. Unfortunately jQuery 1.4 is included only since WordPress 3.0, so if you're using WordPress 2.9.x and ealier, use the live() method instead of:
$("a[href^='"+siteUrl+"']:not([href*=/wp-admin/]):not([href*=/wp-login.php]):not([href$=/feed/])").live("click", function() {
    location.hash = this.pathname;
    return false;
});
Note that the href attribute of internal links are not modified. This solves the first problem in Chris Coyer's code.
3.3. Add event listener to search form
Adding event listener to search form when it's submitted is very similar to adding event listener to internal link's click:
$("#searchform").submit(function(e) {
    location.hash = '?s=' + $("#s").val();
    e.preventDefault();
});
When search form is submitted, we put the search parameter and search query into url's hash. Then prevent the default action to not redirect to search result page.
3.4. Load content when hash changed
When url's hash is changed, we will get the new content and put it in the #container section:
$(window).bind('hashchange', function(){
    url = window.location.hash.substring(1);

    if (!url) {
        return;
    }

    url = url + " #content";

    $mainContent.animate({opacity: "0.1"}).html('<p>Please wait...</>').load(url, function() {
        $mainContent.animate({opacity: "1"});
    });
});
First, we get the current hash. If it's empty, then do nothing. Else, we create the needed url to get content. The url needs to be added #content because we don't want to get all page content, but only the #content section. The #content section in Thematic is the child element of #container (the only child), so when we get it, we can immediately put it inside #container.
If you use another theme, check the id of the content section with Firebug as I mentioned above and change #content to proper value.
We use the opacity animation to fade out the content, then put a "Please wait..." string to tell users that the page's being loaded. When the page has been loaded, we just animate the opacity to 1 to show the content.
This code is simple, but it works beautifully. Because we use the hash-change library, the script works well with back/forward buttons. This solved the second problem in Chris Coyer's code.
3.5. Wait! When page first loads
When the blog first loads, if the location is the home page (for example http://localhost/wp/), then our code works fine. But after some times you navigate through the blog and get a location of a blog post: http://localhost/wp/#/wp/a-paginated-post/, you paste it into a new tab and run. What happens? The browser still loads the homepage, not the specified page we want!
To solve this problem, just use the following code:
$(window).trigger('hashchange');
This will check the url's hash. If it's changed (i.e. different from default value), then the hash-change event is fired, and we get exactly the content we want.
So, our final javascript code is:
jQuery(document).ready(function($) {
    var $mainContent = $("#container"),
        siteUrl = "http://" + top.location.host.toString(),
        url = '';

    $(document).delegate("a[href^='"+siteUrl+"']:not([href*=/wp-admin/]):not([href*=/wp-login.php]):not([href$=/feed/])", "click", function() {
        location.hash = this.pathname;
        return false;
    });

    $("#searchform").submit(function(e) {
        location.hash = '?s=' + $("#s").val();
        e.preventDefault();
    });

    $(window).bind('hashchange', function(){
        url = window.location.hash.substring(1);

        if (!url) {
            return;
        }

        url = url + " #content";

        $mainContent.animate({opacity: "0.1"}).html('<p>Please wait...</>').load(url, function() {
            $mainContent.animate({opacity: "1"});
        });
    });

    $(window).trigger('hashchange');
});
Save it into ajax.js file inside thematic-child/js folder. Refresh the browser to see how it works.
The script can be changed easily to fit your WordPress theme, and now you already have an AJAXed WordPress theme. I hope this tutorial is useful for you when implement AJAX functionality in your WordPress blog. If you have some questions or suggestions, please leave me a comment.