Update: The script was turned into Meta Box WordPress plugin and is being developed. Visit plugin page to see more info and download latest version.
WordPress is one of the most powerful blog platforms out there. One of its strength is the ability to allow post authors to assign custom fields to a post. This arbitrary extra information is known as meta-data and can be added using the Custom Fields box under the content editor of writing post screen. The problem is that adding these meta data handy is not a good idea for most users because they have to know what are the meta key and type of its value. It's better when developers create a custom meta box that can show which information is needed and give some explanations to users. In this tutorial, we'll see how to creating a better meta box in WordPress post editing page.
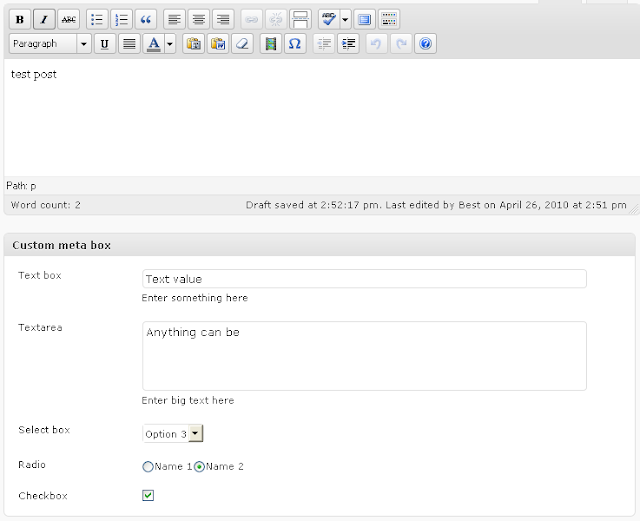
Before we start, make sure that you theme has functions.php file. All of our code will be pasted into this file. And our result will be like this (click to enlarge):
Step 1. Define meta box with all needed fields
Open the functions.php file, and put the following code into it:
$prefix = 'dbt_';

$meta_box = array(
    'id' => 'my-meta-box',
    'title' => 'Custom meta box',
    'page' => 'post',
    'context' => 'normal',
    'priority' => 'high',
    'fields' => array(
        array(
            'name' => 'Text box',
            'desc' => 'Enter something here',
            'id' => $prefix . 'text',
            'type' => 'text',
            'std' => 'Default value 1'
        ),
        array(
            'name' => 'Textarea',
            'desc' => 'Enter big text here',
            'id' => $prefix . 'textarea',
            'type' => 'textarea',
            'std' => 'Default value 2'
        ),
        array(
            'name' => 'Select box',
            'id' => $prefix . 'select',
            'type' => 'select',
            'options' => array('Option 1', 'Option 2', 'Option 3')
        ),
        array(
            'name' => 'Radio',
            'id' => $prefix . 'radio',
            'type' => 'radio',
            'options' => array(
                array('name' => 'Name 1', 'value' => 'Value 1'),
                array('name' => 'Name 2', 'value' => 'Value 2')
            )
        ),
        array(
            'name' => 'Checkbox',
            'id' => $prefix . 'checkbox',
            'type' => 'checkbox'
        )
    )
);
Let me explain the code:
In the beginning of the code, we defined a prefix:
$prefix = 'dbt_';
This prefix will be added before all of our custom fields. Using prefix can prevent us from conflicting with other scritps that also use custom fields.
The next variable $meta_box will hold all information about our meta box and all custom fields we need. Let's look at the first lines:
$meta_box = array(
    'id' => 'my-meta-box-1',
    'title' => 'Custom meta box',
    'page' => 'post',
    'context' => 'normal',
    'priority' => 'high',
These are meta box's attributes:
id: just the ID of meta box, each meta box has an unique IDtitle: the meta box titlepage: The type of Write screen on which to show the meta box ('post', 'page', or 'link') (for WP 3.0, see note below)context: The part of the page where the meta box should be shown ('normal', 'advanced' or (since 2.7) 'side')priority: The priority within the context where the boxes should show ('high' or 'low')
For WordPress 3.0: If you're using custom post type in WordPress 3.0 (for example you created new post type 'album'), you can change the 'page' attribute to 'album' to show the meta box in the editing screen of 'album' only.
Below are custom fields. Each custom field has the following attributes:
name: The name of the custom field, it will be shown to user.desc: A short description explaining what it is to the user.id: the id of the field, prefixed by the$prefix. It will be used to store the custom field valuetype: the input type: select, text, textarea, radio or checkboxoptions: used to declare an array of options for a some type of input (select, radio)std: the default value of the custom field.
Step 2. Add meta box to Edit Page
To add a meta box to edit page, we hook to admin_menu action as in the following code:
add_action('admin_menu', 'mytheme_add_box');

// Add meta box
function mytheme_add_box() {
    global $meta_box;

    add_meta_box($meta_box['id'], $meta_box['title'], 'mytheme_show_box', $meta_box['page'], $meta_box['context'], $meta_box['priority']);
}
The function is used to add a meta box to edit page is add_meta_box. This function has 6 parameters:
add_meta_box($id, $title, $callback, $page, $context, $priority);
Each parameter has the same meaning as the meta box's attribute (I've explained it before), except the $callback parameter. The $callback parameter is the name of callback function, used to display HTML code of custom fields. In our situation, this function is mytheme_show_box.
Step 3. Show meta box
We need to implement the callback function mytheme_show_box to show HTML code of all custom fields. The function looks like:
// Callback function to show fields in meta box
function mytheme_show_box() {
    global $meta_box, $post;

    // Use nonce for verification
    echo '<input type="hidden" name="mytheme_meta_box_nonce" value="', wp_create_nonce(basename(__FILE__)), '" />';

    echo '<table class="form-table">';

    foreach ($meta_box['fields'] as $field) {
        // get current post meta data
        $meta = get_post_meta($post->ID, $field['id'], true);

        echo '<tr>',
                '<th style="width:20%"><label for="', $field['id'], '">', $field['name'], '</label></th>',
                '<td>';
        switch ($field['type']) {
            case 'text':
                echo '<input type="text" name="', $field['id'], '" id="', $field['id'], '" value="', $meta ? $meta : $field['std'], '" size="30" style="width:97%" />', '<br />', $field['desc'];
                break;
            case 'textarea':
                echo '<textarea name="', $field['id'], '" id="', $field['id'], '" cols="60" rows="4" style="width:97%">', $meta ? $meta : $field['std'], '</textarea>', '<br />', $field['desc'];
                break;
            case 'select':
                echo '<select name="', $field['id'], '" id="', $field['id'], '">';
                foreach ($field['options'] as $option) {
                    echo '<option ', $meta == $option ? ' selected="selected"' : '', '>', $option, '</option>';
                }
                echo '</select>';
                break;
            case 'radio':
                foreach ($field['options'] as $option) {
                    echo '<input type="radio" name="', $field['id'], '" value="', $option['value'], '"', $meta == $option['value'] ? ' checked="checked"' : '', ' />', $option['name'];
                }
                break;
            case 'checkbox':
                echo '<input type="checkbox" name="', $field['id'], '" id="', $field['id'], '"', $meta ? ' checked="checked"' : '', ' />';
                break;
        }
        echo     '</td><td>',
            '</td></tr>';
    }

    echo '</table>';
}
It is a large function, isn't it? But it's not very hard to understand.
In the very first of the function, we create a hidden field to store a nonce number. It's required to verify this came from the our screen and with proper authorization:
echo '<input type="hidden" name="mytheme_meta_box_nonce" value="', wp_create_nonce(basename(__FILE__)), '" />';
And then we display all custom fields in a table. Using the PHP foreach loop, each field is displayed based on its type. Before displaying the custom field's value for select, radio and checkbox input types, we need to check the "saved" value (if it already exists) and compare to the default values. This is done via the line code:
// get current post meta data
$meta = get_post_meta($post->ID, $field['id'], true);
The HTML code of each custom fields is just input fields with some attributes like id, name, value, etc.
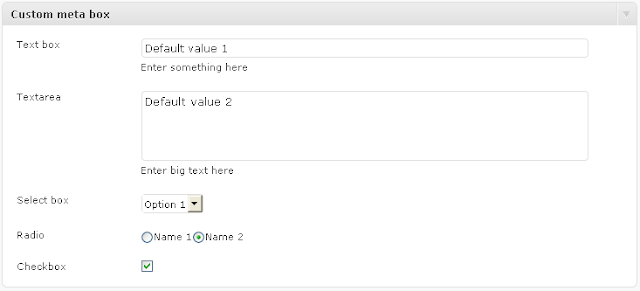
After this is done, we'll get the meta box on Editing Page like this (click to enlarge):
Step 4. Save meta data when post is edited
To save the data of custom fields, we need to hook to save_post action:
add_action('save_post', 'mytheme_save_data');

// Save data from meta box
function mytheme_save_data($post_id) {
    global $meta_box;

    // verify nonce
    if (!wp_verify_nonce($_POST['mytheme_meta_box_nonce'], basename(__FILE__))) {
        return $post_id;
    }

    // check autosave
    if (defined('DOING_AUTOSAVE') && DOING_AUTOSAVE) {
        return $post_id;
    }

    // check permissions
    if ('page' == $_POST['post_type']) {
        if (!current_user_can('edit_page', $post_id)) {
            return $post_id;
        }
    } elseif (!current_user_can('edit_post', $post_id)) {
        return $post_id;
    }

    foreach ($meta_box['fields'] as $field) {
        $old = get_post_meta($post_id, $field['id'], true);
        $new = $_POST[$field['id']];

        if ($new && $new != $old) {
            update_post_meta($post_id, $field['id'], $new);
        } elseif ('' == $new && $old) {
            delete_post_meta($post_id, $field['id'], $old);
        }
    }
}
In the beginning of the function, we check the nonce to make sure that the data is come from edit post with proper authorization.
And then, we check the autosave feature. We don't want to save the data automatically via autosave feature. We want to save the data only when use clicked on the button Save (or Publish). If you really want to save the data via autosave feature, you can delete these lines (don't worry, they don't affect to the rest of code).
// check autosave
if (defined('DOING_AUTOSAVE') && DOING_AUTOSAVE) {
    return $post_id;
}
The last check is the user capability. We just check if user can edit post or page.
After all of verifications, we use the foreach loop to walk through every custom fields. If the custom fields is not in the database or it is changed, we update it (note: the update_post_meta also adds post meta when the meta is not present in database). If the custom fields is empty, we delete it from database.
When the post is edited or published, we can check the keys and values of custom fields as in the following screenshot (click to enlarge):
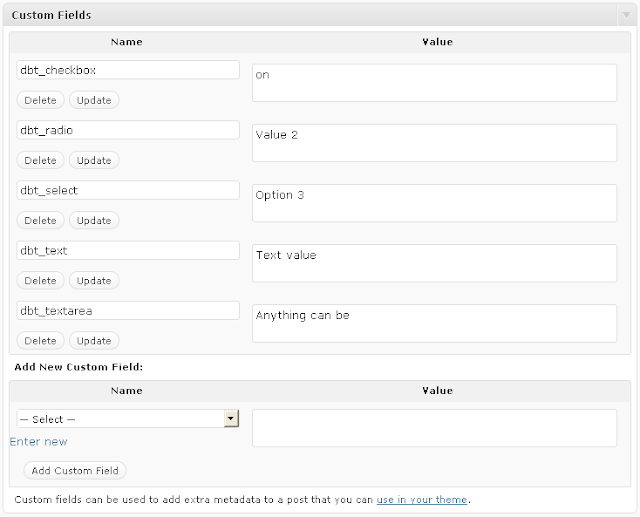
As you can see, that works!
Enjoy meta box script for WordPress
Using custom meta box is a great way to make custom fields more friendly to users. It helps us much to add extra information to a post. I hope this tutorial is helpful for you to easier implement a custom meta box in WordPress. I have made a file with all necessary code that you can include in your functions.php file. All you need to change (to fit your requirements) is only the prefix and meta box declaration at the very top of code.
If you have some opinions or ideas, feel free to share your thoughts in the comments.
This post is the first part of meta box series: