You've heard about localization (internationalization) WordPress plugins, which automatically translate plugin text into your blog language without changing any codes. But what about localization themes? How can we make a theme multilingual? It is as easy as working with plugins as you'll see in this post.
Loading theme textdomain
The first step to make a theme multilingual is loading theme textdomain. Assume that our theme language files (.MO and .PO files, we will create them later) are located in the sub directory /lang/ of theme directory (ie. /wp-content/themes/theme_name/lang/). To load these language files, open functions.php file of your theme and put this code into it:
$lang = TEMPLATE_PATH . '/lang';
load_theme_textdomain('theme_textdomain', $lang);
Here 'theme_textdomain' is theme textdomain. Change it into anything you want, but it has to be unique. Usually, the theme name is used for this parameter.
Using _e(); and __(); functions
Now open your theme files (index.php, header.php, sidebar.php, etc.) and find all places where you echo strings. And change them with following instructions:
Instead of using echo function:
<?php echo 'Some string'; ?>
use _e() function:
<?php _e('Some string', 'theme_textdomain'); ?>
Instead of using "naked" strings:
<?php echo '<h2>Some string</h2>'; ?>
use __() function:
<?php echo '<h2>' . __('Some string', 'theme_textdomain') . '</h2>'; ?>
Remember the 'theme_textdomain' parameter which we declared in the section above. These functions will look into the .MO files, if strings are found then they'll use them, otherwise the original strings are used.
For more information about using localized functions, see in WordPress Codex.
Creating .MO and .PO language files
After changing theme codes, we need to translate the text. The translated text are put in .MO and .PO files (which are located in a sub directory /lang/ of theme directory).
The easiest way to create .MO and .PO files are using PoEdit. After download and install PoEdit, open it and go to menu File → New catalog. In the Project info tab, just enter some information about project like name, email, charset, etc.
In the Path tab, enter ./ for the Base path and add a new value .. to Paths:

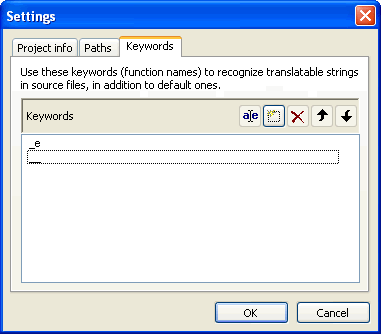
In the Keywords tab, add __ and _e to keywords:
Click OK. PoEdit will automatically scan files in your theme directory, and list all strings. Your work now is just translating them. After that, save the file in format language.po (ie. pt_BR.po, de_DE.po, etc.) in the /lang/ directory.
List of keywords
__
_e
__ngettext:1,2
_n:1,2
__ngettext_noop:1,2
_n_noop:1,2
_c
_nc:4c,1,2
_x:1,2c
_nx:4c,1,2
_nx_noop:4c,1,2
_ex:1,2c
esc_attr__
esc_attr_e
esc_attr_x:1,2c
esc_html__
esc_html_e
esc_html_x:1,2c
That's all. When you change blog language, all strings of theme are changed correspondingly. Localization is needed when you want to spread your themes or to sell them. I hope this post is useful for you.
In case you want to use a plugin to translate your site, please read this list of top 7 multilingual plugins.